
More Mac users are navigating their macOS using the marvelous Finder, although most of them still can’t get a grasp of how many things this tool can do. Most folks are familiar with the basics of Finder, Apple’s way of allowing you to organize, manage and locate files but Apple’s file-management system includes some extremely powerful features that can take your workflow from a headache to a hole in one.
These lesser-known shortcuts can save you hours per week, cut down on digital detritus, and make using your Mac even more fun. Whether you’re a student taking on course work, a professional engulfed in projects, or just someone who wants to get more out of their digital life, these seven tricks will change the way you use files on your device.
Today, we’ll look at power user search tricks, navigation shortcuts, and organizational tips that most Mac users never bother to learn. Each trick is accompanied by clear explanations and real-world examples that you can perform.
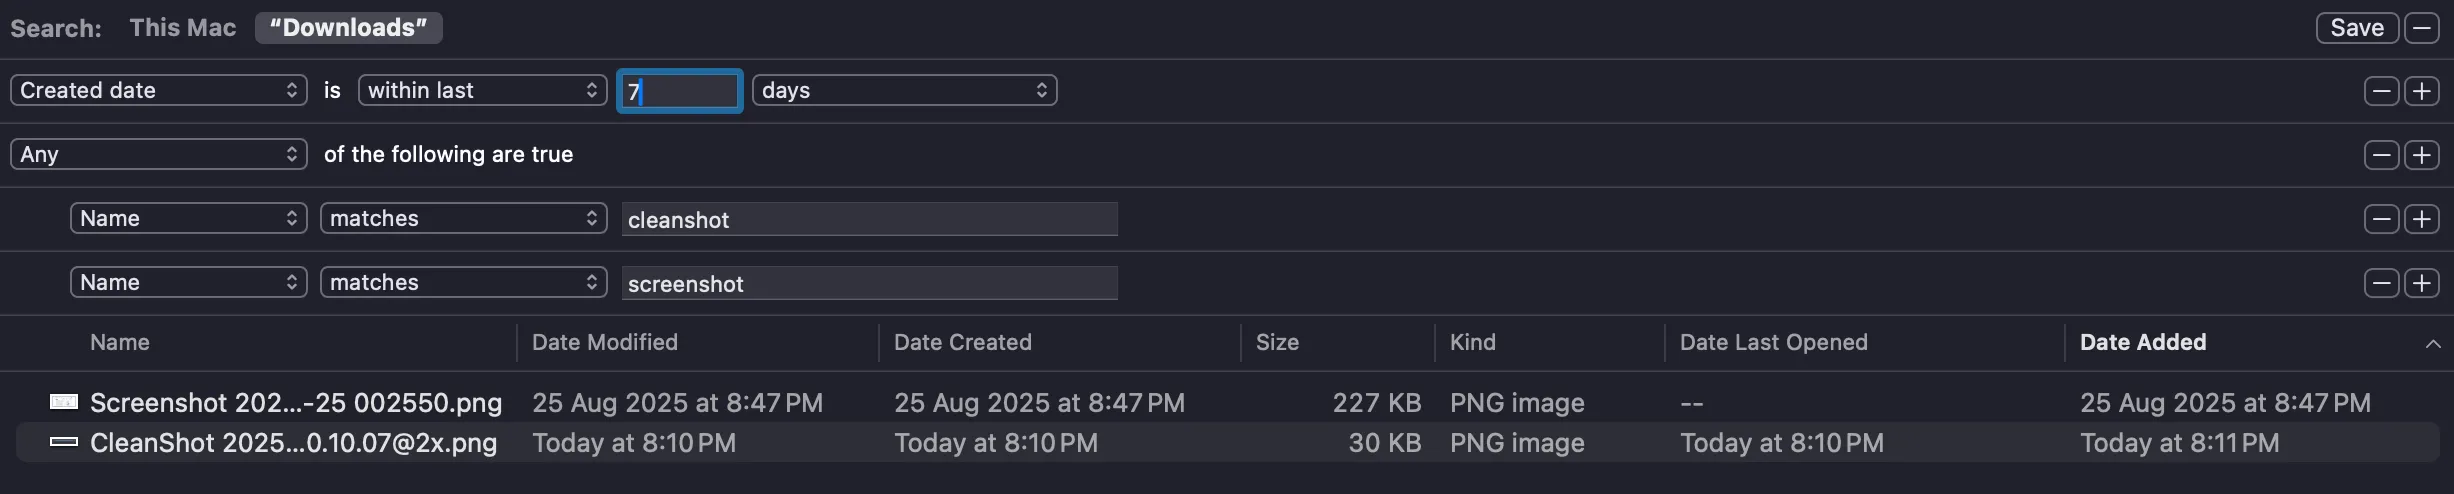
Smart Folders are one of the coolest and underused features in Finder. Consider them saved searches that refresh themselves, always monitoring your Mac and displaying results that match your search criteria. They’re essential for an efficient macOS file workflow.
Don’t continue searching for the exact files you need because Smart Folders can do that for you. Here’s how to create one:
Save button in the upper right cornerAdd to Sidebar when savingFor instance, make a Smart Folder that displays any documents you modified in the last week. And it will fill itself with your latest writing, so you can continue where you last left off.
Here are some handy Smart Folder settings, depending on what you need:
Smart Folders save time from repeatedly searching for the same file over and over and prevent you from missing files you wanted to use.
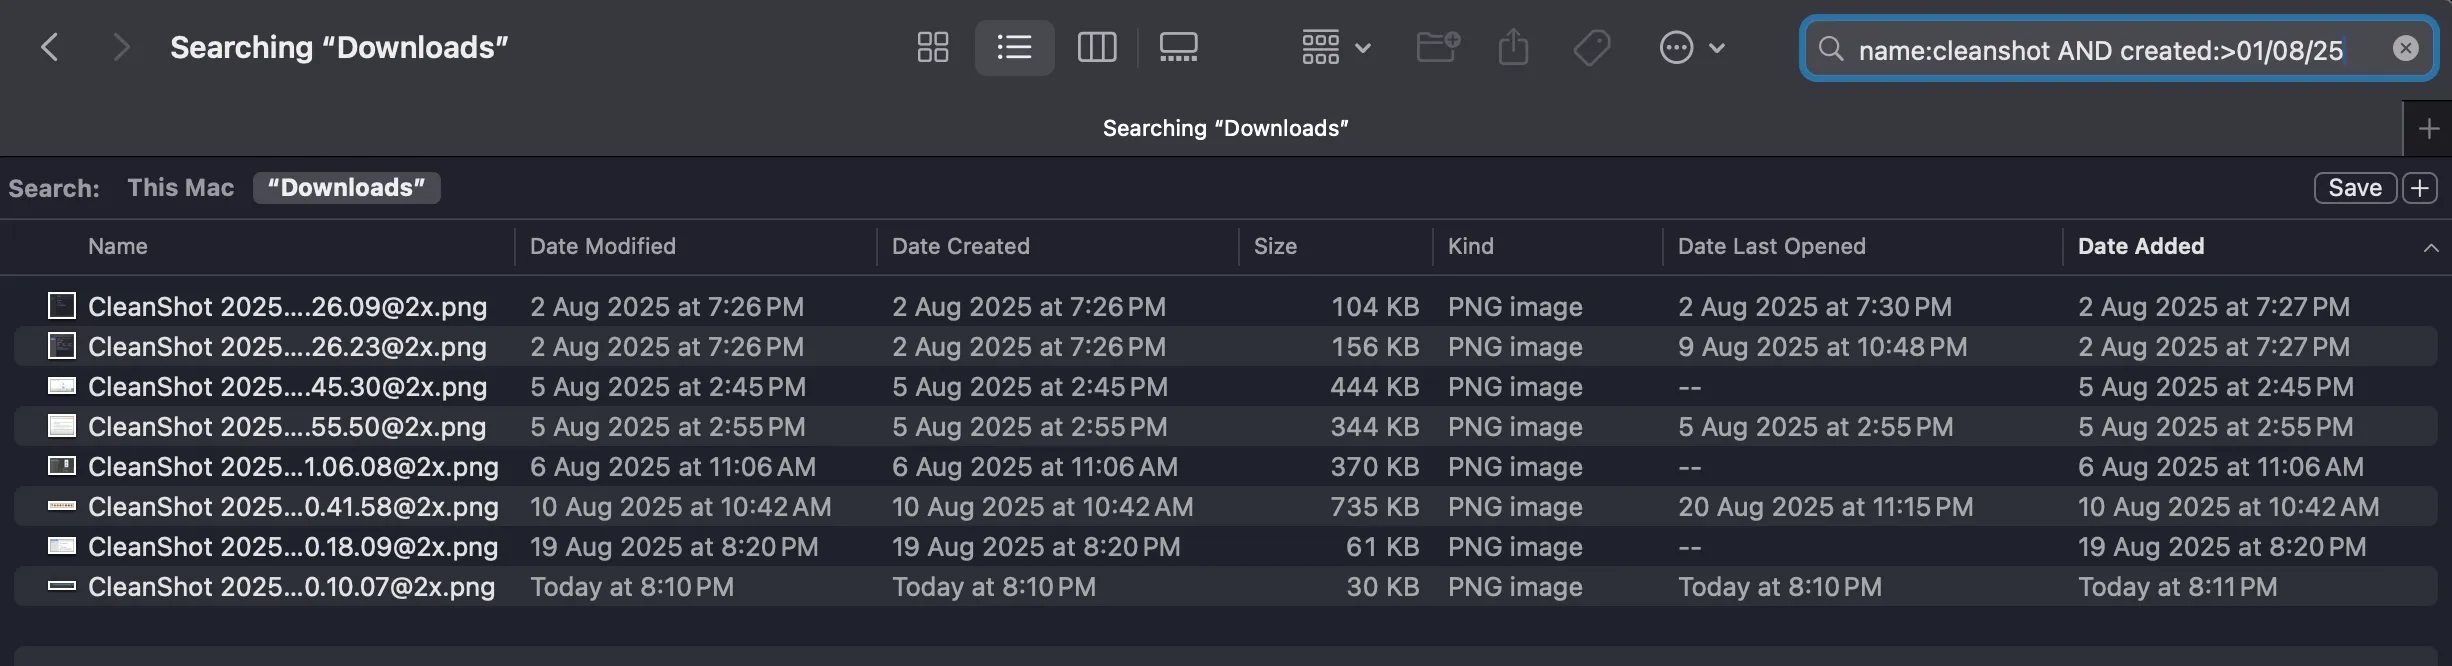
Most of us only scratch the surface of Finder search. The real magic shows up when you add Boolean logic AND, OR, NOT to say must have, either/or, and ditch it. Finder gives you two ways to do that; use the right one for the job.
Tab browsing turns Finder into a multitasker’s dream come true. Similar to web browser tabs, Finder tabs allow you to keep multiple locations open at once.
Open new tabs instantly with Command + T, or right-click a folder and select Open in New Tab. Each tab has its own location and view settings, so you can adjust how areas look or act to suit your needs.
Navigate backwards and forwards between tabs with Command + Shift + [ and ] respectively. Close tabs with Command + W, and merge all windows into tabs with Window > Merge All Windows.
Group your tabs by project or purpose. Keep your Desktop, Downloads, and current project folder directly at your fingertips so you can get to all the essentials right away. This method removes that endless back and forth time wasting that can result from busy work days.
The column view presents a distinctive way to browse your file system, with the full path displayed from your origin to your selection. It is a good way to find out file dependencies and folder structure.
Each column displays the contents of the item selected in the previous column. To navigate, click on any folder to view its contents in the next column (similar to breadcrumbs on a navigation path).
For touch typists, use arrow keys for navigation. This keyboard navigation is often faster than clicking.
Resize columns by dragging the dividers between columns. Stretch columns to see longer filenames, or shrink them to display additional levels at a glance.
The right-hand preview column displays file information and thumbnails. Toggle this preview with Command + Shift + P to free up screen space when you don’t need it.
Quick Actions make common file operations easily accessible in Finder when you select a file and right click to get to Quick Actions. These actions help you avoid opening apps for basic tasks.
macOS comes with some very convenient Quick Actions built-in:
Create custom Automator Quick Actions for repetitive tasks as part of your workflow. For instance, write an action that resizes images to certain dimensions or converts files from one format to another.
Open Automator (Applications > Automator), and select your document type as Quick Action. You can access these custom actions using the same context (right-click) menu where the built-in options are listed.
Practically no user pays attention to the Path Bar and Status Bar but they are indispensable for navigation and content selection.
Display the Path Bar by choosing View > Show Path Bar (Option–Command–P), and show the Status Bar by choosing View > Show Status Bar (Command–/). These bars take up minimal screen real estate and provide maximum utility.
In the Path Bar, you’ll see exactly where you are in the file system, and each folder is clickable. This feature is particularly useful when navigating deep folder structures.
The Status Bar displays:
This is useful for making decisions about file management and for planning storage needs without having to install additional apps.
Keyboard shortcuts are what distinguish casual users from power users. Learn these combinations and speed through Finder like never before.
| Shortcut | Action |
|---|---|
| Command + Up Arrow | Go up one folder |
| Command + Down Arrow | Open highlighted item |
| Command + [ | Go back |
| Command + ] | Go forward |
| Command + 1/2/3/4 | Switch view mode (Icon/List/Column/Gallery) |
| Command + Delete | Move to Trash |
| Command + Shift + Delete | Empty Trash |
Select multiple files efficiently:
These shortcuts are universal regardless of the view mode and will help you perform file operations much faster.
Tags and the Favorites sidebar provide a more natural way to organize content than solely navigating through dozens of nested folders.
Create your own disciplined tagging system that you can follow consistently and will fit your workflow. Use tags for:
You can right-click on files to apply tags through the Tags submenu, or use keyboard shortcuts Control + 1 through Control + 7 for your most frequently used tags.
Personalize the Finder sidebar by dragging your favorite folders to the Favorites section. Get rid of unwanted ones by right-clicking and selecting Remove from Sidebar.
This personalized sidebar allows you quick access to your most frequented places, even when you are deep in a folder structure.
Q: Is there a way to restore accidentally deleted Smart Folders?
A: Smart Folders are saved searches, so you can re-create them with little effort. But when they’re removed from Trash, they’re gone for good. It might be worthwhile to backup any valuable Smart Folder definitions by noting the search parameters.
Q: Do Boolean searches apply to file content or just file names?
A: Boolean searches work on filenames, metadata and file content (for supported file types). Plain text files, PDFs and emails are indexable based on their content, while media files depend on their metadata.
Q: How many tabs can I have open in Finder?
A: There is no strict limit to the number of Finder tabs you can have open; performance may begin to suffer as the total reaches the dozens. 5-10 tabs let users maintain their productivity without cluttering up the interface.
Q: Can I use Quick Actions with multiple files?
A: Yes, many Quick Actions will apply to multiple files at the same time. For instance, you can select several photos and bundle them into one PDF.
Q: Do keyboard shortcuts function in all Finder view modes?
A: Most keyboard shortcuts are available in all view modes, while some are mode-specific. Arrow key navigation works differently in Icon view compared to List or Column view.
Q: Do tags sync across multiple Macs?
A: Tags will sync automatically over iCloud when you have Desktop & Documents Folders enabled in iCloud Drive settings. This helps ensure consistency across devices.
These seven Finder tricks are just the tip of the iceberg in terms of what you can accomplish with file management in macOS. Combined with Smart Folders, Boolean filters, tab navigation, and the other methods covered here you’ll see a considerable boost in your productivity and digital housekeeping right away.
Begin with one or two tricks that address what’s most annoying you, and work in others as they feel right. Keep in mind that you won’t see results right away, but these practices pay dividends as muscle memory takes hold.
Your Mac is powerful, but with knowledge your powers become limitless. These hidden Finder features are proof that the most useful tools can sometimes be hiding in plain sight. Master your digital life and realize how much fun computing can be once you’re in the know about the Apple secrets and tricks that engineers built into every Mac.
The next time you open Finder, you will look at it with fresh eyes not just a file browser, but also a highly-refined productivity app to help you find digital files easier and stay more organized.